It is very rare to see older plaster without any cracks, and there are those of us that find cracks part of plaster’s aesthetic character and charm – love plaster, love cracks. Cracking, however, can also be serious and lead to further plaster damage if not taken care of. Cracks occur for a variety of reasons, many of which are simply the natural reactions of plaster compounds and building materials. Climate and temperature changes, building settling and moving over time, weight loads, chimney movement and environmental stresses (heavy traffic, nearby trains, construction blasting) all contribute to plaster cracking. Cracking is further exacerbated by any structural disturbances or repairs to a building (foundation work, sill repair), leaving a building unheated during the winter, deteriorating framing and timber (rotting sills, weak floors and joists, insufficient framing), or water leaks. Some or any of these conditions are usually present in older homes and buildings.
As a caretaker of an older building, it is a good idea to learn some basics of plaster repair. Cracks are a good place to start with and will provide a foundation for other repairs such as patching and skimming. Cracks can be repaired, and if done correctly you will have long-lasting to permanent results. Using spackling, taping, and/or repainting are quick fixes that usually result in a crack coming back. For a sound repair to any crack, the plaster on each side of it must be stopped from moving or shifting, and the substrate material (wood or rock lath) must be solid and secure with no bouncing. Push gently on the plaster on each side of a crack to test for movement. If it gives, or has delaminated from its substrate, more than 1/8″ than further repairs such as reattachment is necessary. If the substrate is week, some sort of stabilization is necessary. Assuming we have a crack in stable plaster in need of repair, we find our crack repair method very successful.
Repair Procedure
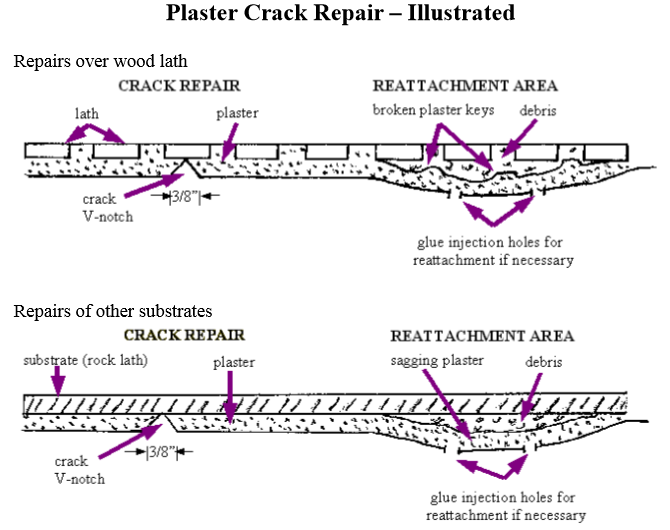
- Begin a crack repair by V-Notching out the crack. Remove the plaster along both sides of the crack with a utility knife to a V’d, gully section down to the substrate.
- Any additional loose plaster around the crack can be removed at this point, and any reattachment to the sides of the crack can be completed.
- Vacuum out and damp-sponge the notch to remove any plaster dust and residue.
- Fill the notch using a plaster or setting joint compound. We like to use Durabond because it sets up quickly and has its own bonding agent for a solid fill. Usually 2–3 coats of filler are necessary to bring the repair flush with the surface.

 Peter Lord Plaster & Paint, Inc.